Ubuntu 10.04, Django and GAE - Part 2

All my Django sites are running 1.2, which poses a conflict with writing apps for Google’s App Engine, as use_library currently only supports < Django 1.1. There are two solutions that I found: a) use virtualenv, or b) chroot, which I’ve already detailed. This document will hopefully show you how to create a virtual environment to use a secondary django version, especially for GAE. Of the two options, I think this one is a bit quicker, but there will likely be tradeoffs that a chroot environment can deal with better, e.g. python imaging (I don’t use it for GAE).
First, install PIP and virtualenv:

kelvinn@kelvinn-laptop:~/workspace$ sudo easy_install -U pip
kelvinn@kelvinn-laptop:~/workspace$ sudo pip install -U virtualenv

Second, configure an environment for any app that will use Django 1.1:

kelvinn@kelvinn-laptop:~/workspace$ virtualenv --python=python2.5 --no-site-packages django-1.1
New python executable in django-1.1/bin/python
Installing setuptools............done.
kelvinn@kelvinn-laptop:~/workspace$ pip install -E django-1.1 yolk
kelvinn@kelvinn-laptop:~/workspace$ pip install -E django-1.1 Django==1.1

Now, download the python GAE sdk and put it in the django-1.1 folder. I also just dump any project directory requiring Django 1.1 into this django-1.1 folder, although I guess you could create a virtualenv for each project. The last thing to do is start the virtual environment, and run the GAE app.

kelvinn@kelvinn-laptop:~/workspace$ source django-1.1/bin/activate
(django-1.1)kelvinn@kelvinn-laptop:~/workspace$ yolk -l
(django-1.1)kelvinn@kelvinn-laptop:~/workspace$ cd django-1.1
(django-1.1)kelvinn@kelvinn-laptop:~/workspace/django-1.1$ ls
bin  google_appengine  include  lib  myproject1 myproject2
(django-1.1)kelvinn@kelvinn-laptop:~/workspace/django-1.1$ google_appengine/dev_appserver.py myproject1

When you’re all finished, you can jump out of virtualenv:

(django-1.1)kelvinn@kelvinn-laptop:~/workspace/django-1.1$ deactivate

Update: You’ll find this article especially interesting if you get an error such as the following:

UnacceptableVersionError: django 1.1 was requested, but 1.2.0.beta.1 is already in use
Most Frequently Used French Words

Status: ✅

I’m currently studying French, and if you’ve read any of this site, you’ll notice I’m a bit of a techie. Often several of my interests collide, which is what happened today. I was searching for the “most frequent french words,” and while I found some lists, nothing was exactly what I wanted.
My desire was to have a PDF of the top few thousand most used French words. With the English translation next to it. In order. I’ve found some great resources, which I’ll list now

I’ve also found 100s of sites with 50 words or so - not exactly what I wanted. This spawned a question for me: if I were to search a popular French newspaper website, what words would be the most frequent? I would want to learn those first. A few hours later, and I’ve compiled that list. I’ll write the details of how I did it at the end, but just know I collected over 16,000 unique words, and “read” over 80,000 words from a variety of articles. Below is a PDF of the most popular words, ranked in order, with (maybe incorrect) English translations.

The 625 Most Unofficially Frequent French Words

More to come…! I’m going to continue building the database to make sure the ranking is correct, and will make some pretty graphs when I have time. I will also likely modify things to include what type of word it is, and an example in a sentence.

Please feel free to use this list as you see fit in accordance with CC by 4.0

ISO Code Error

I’ve received this error a few times when working with pytz:

Error reading file '/usr/share/xml/iso-codes/iso_3166.xml'

In short, install the ‘iso-codes’ package in Ubuntu/Debian. I’m sure this is covered in the manual that I didn’t read, but I’m sure others didn’t read it too.

apt-get install iso-codes

Zenoss Default Password

I’ve evaluated Zenoss before, but forgot the default password, and searching for it didn’t come up with anything quickly. I tried everything under the sun: password, 1234, admin, God, Sex, but alas, grep to the rescue:

kelvin@monitor:/usr/local/zenoss/zenoss/etc$ grep admin *
hubpasswd:admin:zenoss

Update: it is listed on page 4 of the Admin PDF :)

Integrating OSSEC with Cisco IOS

I rank OSSEC as one of my favorite pieces of open source software, and finally decided to play around with it more in my own free time. (Yup, I do this sort of stuff for fun). My goal was quite simple: send syslog packets from my Cisco to my “proxy” server, running OSSEC. I found that, although OSSEC supports Cisco IOS logging, it didn’t really work. In fact, I couldn’t find any examples or articles of anybody actually getting it to work.

I initially tried to get it to work “correctly,” and soon settled to “just getting it to work.” I implemented some rules in the local_rules.xml file, which worked, but I’m pretty stubborn, and wanted to do it “correctly.” With a couple pots of tea I became much, much more familiar with OSSEC. The key (and a lot of credit) goes to Jeremy Melanson for hinting at some of the updates to the decoder.xml file that need to take place.

The first step is to read the OSSEC + Cisco IOS wiki page. Everything on that page is pretty straight forward. I then added three explicit drop rules at the end of my Cisco’s ACL:

...

access-list 101 deny tcp any host 220.244.xxx.xxx log
access-list 101 deny ip any host 220.244.xxx.xxx log
access-list 101 deny udp any host 220.244.xxx.xxx log

(220.244.xxx.xxx is my WAN IP, and I’m sure you could figure out xxx.xxx pretty darn easily, but I’ll x them out anyways).

To reiterate, OSSEC needs to be told to listen for syslog traffic, which you should be set on the Cisco. If you haven’t done this, go re-read the wiki above.

<remote>
<connection>syslog</connection>
<allowed-ips>192.168.0.1</allowed-ips>
</remote>

On or around line 1550 in /var/ossec/etc/decoder.xml I needed to update the regex that was used to detect the syslog stream.

...

<decoder name="cisco-ios">
<!--<prematch>^%\w+-\d-\w+: </prematch>-->
<prematch>^%\w+-\d-\w+: |^: %\w+-\d-\w+:</prematch>
</decoder>
 
<decoder name="cisco-ios">
<program_name>
<!--<prematch>^%\w+-\d-\w+: </prematch>-->
<prematch>^%\w+-\d-\w+: |^: %\w+-\d-\w+: </prematch>
</program_name></decoder>
 
<decoder name="cisco-ios-acl">
<parent>cisco-ios</parent>
<type>firewall</type>
<prematch>^%SEC-6-IPACCESSLOGP: |^: %SEC-6-IPACCESSLOGP: </prematch>
<regex offset="after_prematch">^list \d+ (\w+) (\w+) </regex>
<regex>(\S+)\((\d+)\) -> (\S+)\((\d+)\),</regex>
<order>action, protocol, srcip, srcport, dstip, dstport</order>
</decoder>


...

In the general OSSEC configuration file, re-order the list of rules. I had to do this because syslog_rules.xml includes a search for “denied”, and that triggers an alarm.

...
<include>telnetd_rules.xml</include>
<include>cisco-ios_rules.xml</include>
<include>syslog_rules.xml</include>
<include>arpwatch_rules.xml</include>
...

Remember that these dropped events will go into /var/ossec/logs/firewall/firewall.log. Because this is my home connection, and I don’t have any active_responses configured (yet!), I tightened the firewall_rules.xml file (lowering the frequency, raising the timeframe).

And in the end, I get a pretty email when somebody tries to port scan me.

Pretty email

OSSEC HIDS Notification.
2008 Nov 15 23:19:36
 
Received From: proxy->xxx.xxx.xxx.xxx
Rule: 4151 fired (level 10) -> "Multiple Firewall drop events from same source."
Portion of the log(s):
 
: %SEC-6-IPACCESSLOGP: list 101 denied tcp 4.79.142.206(36183) -> 220.244.xxx.xxx(244), 1 packet
: %SEC-6-IPACCESSLOGP: list 101 denied tcp 4.79.142.206(36183) -> 220.244.xxx.xxx(253), 1 packet
: %SEC-6-IPACCESSLOGP: list 101 denied tcp 4.79.142.206(36183) -> 220.244.xxx.xxx(243), 1 packet
: %SEC-6-IPACCESSLOGP: list 101 denied tcp 4.79.142.206(36183) -> 220.244.xxx.xxx(254), 1 packet


--END OF NOTIFICATION

Using Django with SQL Server and IIS

As you can tell from reading some of the other pages, I like Linux and open source. But I also like to answer the question “what if…” This post is my [brief] run down of answering “what if I could run Django on Server 2003 with SQL Server and IIS.” Why, you may ask? To be honest with you, at this point, I don’t really know. One of the deciding factors was seeing that the django-mssql project maintains support for inspectdb, which means I could take a stock 2003 server running SQL Server, inspect the DB, and build a web app on top of it. The Django docs offer a lengthy howto for using Django with IIS and SQL Server, but the website for PyISAPIe seems to have been down for the last month or so. Without further delay, below are my notes on installing Django with SQL Server and IIS.

1a) Install python-2.x.x.msi from python.org

1b) Consider adding C:\Python25\ to your Path (right click My Computer, Advanced, Environment Variables. Enter in blahblahblah;C:\Python25\)

  1. Download a 1.0+ branch of Django (and 7-zip if you need it)

3a) Extract the contents of the Django. From inside Django-1.0, execute:

C:\Python25\python.exe setup.py install

3b) Consider adding C:\Python25\Script to your path.
4) Look in C:\Python25\Lib\site-packages – confirm there is a Django package.
5) Checkout django-mssql (http://code.google.com/p/django-mssql/), copy sqlserver_ado from inside source to the site-packages directory
6) Download and install PyWin32 from sf.net
7) Start a test project in C:\Inetpub\ called ’test'

c:\Python25\scripts\django-admin.py startproject test

8a) Create a database using SQL Management Studio, create a user. (First, go to the Security dropdown. Right click Logins, add a new user. Next, right click Databases, New Database. Enter in the name, and change the owner to the user you just created).

8b) Edit the settings.py and add ‘sqlserver_ado’ and add database credentials. Use the below example if your database comes up in the Studio as COMPUTERNAME\SQLEXPRESS (you are using SQLExpress).

import os
DATABASE_ENGINE = 'sqlserver_ado'           # 'postgresql_psycopg2', 'postgresql', 'mysql', 'sqlite3' or 'oracle'.
DATABASE_NAME = 'crmtest'             # Or path to database file if using sqlite3.
DATABASE_USER = 'crmtest'             # Not used with sqlite3.
DATABASE_PASSWORD = 'password'         # Not used with sqlite3.
DATABASE_MSSQL_REGEX = True
DATABASE_HOST =  os.environ['COMPUTERNAME'] + r'\SQLEXPRESS' # I use SQLEXPRESS
DATABASE_PORT = ''             # Set to empty string for default. Not used with sqlite3.
  1. Install/download FLUP: http://www.saddi.com/software/flup/dist/flup-1.0.1.tar.gz
python setup.py install

10a) Download pyisapi-scgi from http://code.google.com/p/pyisapi-scgi/

10b) Extract the files to somewhere you can remember on your computer, like, c:\scgi
11) Double click pyisapi_scgi.py
12a) Follow the directions here: http://code.google.com/p/pyisapi-scgi/wiki/howtoen – I set a temporary different port since I’m just testing this out.
12b) The last few parts might be better served with an image or two:

Using an app pool to get the right permissions

(No resource/photo)

The SCGI configuration file

(No resource/photo)

Properties of the web site

(No resource/photo)
13) Start the scgi process from the Django folder directory

python manage.py runfcgi method=threaded protocol=scgi port=3033 host=127.0.0.1
  1. Test your django page, http://192.168.12.34:8080

(No resource/photo)

PyGTK + py2exe for Windows

I’m writing down these quick notes so I can remember the steps for getting py2exe to work with GTK.

  • Download the GTK+ runtime
  • Download py2exe
  • Copy over your project into the windows box
  • Create a setup.py file (see below)
  • Run “c:\Python25\python.exe setup.py py2exe”
  • Copy over the lib, etc, and share folder from C:\Program Files\GTK2-Runtime into the dist folder
  • Run app!

setup.py:

from distutils.core import setup
import py2exe

setup(
    name = 'ploteq',
    description = 'Bunnys Plotting Tool',
    version = '1.0',

    windows = [
        {
        'script': 'ploteq.py',
        }
    ],

    options = {
        'py2exe': {
        'packages':'encodings',
        'includes': 'cairo, pango, pangocairo, atk, gobject', 
        }
    },

    data_files=[
        'ploteq.glade',
    ]
)

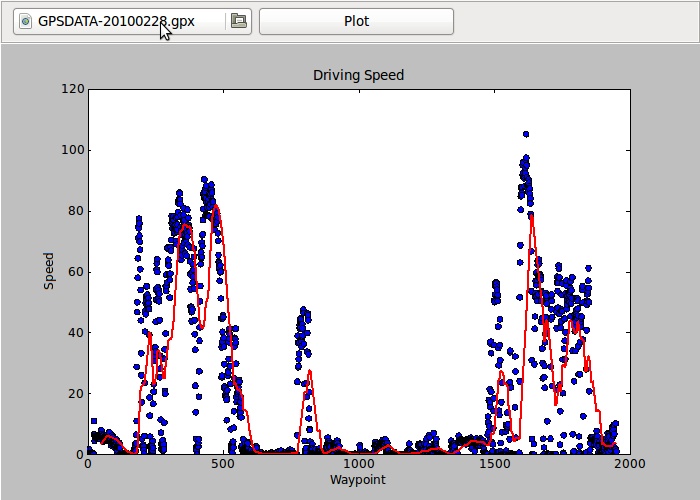
GUI to Plot Driving Speed

I needed another Python fix, and I need one pretty badly. I spent the weekend wondering why it appears to be impossible to edit the GUIDs inside an Exchange mailbox store (read: NOT the GUIDs stored in AD for Exchange). Anyways, I digress.

My goals were simple. I wanted to use Python, wanted something to do with traffic, and wanted to play around with Glade/PyGTK and graphing stuff. My end result was a little app that allows you to specify a GPX file, and it plots the waypoints (and calculates the moving average!). Pretty simple, pretty useless, but pretty fun. I really do like pretty pictures.

I ended up using matplotlab for the graphing part, but I don’t really like how the graphs look. I will likely use Pycha (which dips into Cairo) for my future projects – but we’ll see when that point comes. (If data sensitivity wasn’t an issue, I would totally use Google Charts, since I’m a sucker for APIs).

Another Baby Step

I showed a few of my co-workers my graph and one replied – oh! that’s really cool. (I think only two of my co-workers are actually interested in my geekyness). He then emailed me tonight a .kmz file containing a colorized file of his speed. I looked at the kml and noticed it appeared to be dynamically allocated judging by the top speed. Well, as you could guess, I surely had to modify my code to include colors.

Within an hour I had a semi-working example, and within two hours will easily be done with this blog post. The code might not be perfect, but it first parses the xml and returns the max speed for the trip. Next, it colorizes the speeds based on a scale of 0-255, with 0 being blue for fast and 255 for being yellow, or slow. I was going to study for the CCNA tonight, but it looks like writing Python is just too much fun.

So what, you might ask, are those dips? Good question. They are huge speed bumps (and the tall blue mound in the middle is a really steep hill).

Installing Mapnik on Ubuntu 7.10

I have managed to install mapnik 0.4, 0.5, 0.5.1 and various SVN releases in-between on Ubuntu. While this isn’t in itself exciting, I think I manage to stumble at every installation. I typically forget to add the flags when building, so, to prevent myself from stumbling again, I’m going to write them out here.

Build mapnik

$ python scons/scons.py PYTHON=/usr/bin/python \
PGSQL_INCLUDES=/usr/include/postgresql \
PGSQL_LIBS=/usr/lib/postgresql BOOST_INCLUDES=/usr/include/boost BOOST_LIBS=/usr/lib

Then install it

$ sudo python scons/scons.py install PYTHON=/usr/bin/python \

PGSQL_INCLUDES=/usr/include/postgresql \

PGSQL_LIBS=/usr/lib/postgresql BOOST_INCLUDES=/usr/include/boost BOOST_LIBS=/usr/lib

Then proceed as normal.