Create a Movie from Images

I’ve started leaving my webcam on as a motion detector to find out who is leaving the shopping cards on our lawn, and ultimately have found it useful to stitch the images together into a movie. There are several ways to do this - and my way maybe isn’t the best - but it works for me.

I first installed and configured motion, which I’ve used for years. I then created a file in ~/.motion called motion.com:

$ cat ~/.motion/motion.conf

height 480
width 640
framerate 2

By creating this file, it allows me to start motion without modifying the global motion.conf file permissions, or gasp running it under sudo. There are lots of options you can put in your motion.com file.

With motion installed, and configured, now install mencoder.

I prefer to generate a seed file based on the creation date for each image. If you try to use mencoder with just a *.jpg, it works, but my video jumped around.

$ pwd
/home/path/Desktop/motion
$ ls -rt *.jpg > list.txt

This list.txt file now has the filenames, in chronological order, ready for consumption. I create the video like so:

mencoder mf://@list.txt -o `date +%G%m%d`.avi -ovc lavc -lavcopts vcodec=mjpeg

This will output a file with today’s date in a few seconds. Remember, the `’s are the key by the #1, not quotes.

NetFlow into MySQL with flow-tools

I’ve been side-tracked on another little project, and keep coming back to NetFlow. For this project I’ll need to access NetFlow data with Django, but this is a bit tricky. First, I’m sort of lazy when it comes to my own project; maybe not lazy, I just like taking the most direct route. The most up-to-date NetFlow collector I noticed was flow-tools, and there is even a switch to export the information into MySQL. Sweet! However, I wanted to insert the flows into MySQL automatically, or at least on a regular basis. I first started writing a python script that would do the job, but after a few minutes noticed flow-capture had a rotate_program switch, and started investigating. Since I somehow couldn’t find anywhere instructions how to insert the data automatically, here’s what I came up with:

  1. Download flow-tools; make sure to configure with –with-mysql (and you’ll have to make sure you have the needed libraries).
  2. Create a new database, I called mine ’netflow'.
  3. Create a table that can contain all the netflow fields, a sample is below. I added a “flow_id” field that I used as a primary key, but you don’t necessarily need this.
CREATE TABLE `flows` (
`FLOW_ID` int(32) NOT NULL AUTO_INCREMENT,
`UNIX_SECS` int(32) unsigned NOT NULL default '0',
`UNIX_NSECS` int(32) unsigned NOT NULL default '0',
`SYSUPTIME` int(20) NOT NULL,
`EXADDR` varchar(16) NOT NULL,
`DPKTS` int(32) unsigned NOT NULL default '0',
`DOCTETS` int(32) unsigned NOT NULL default '0',
`FIRST` int(32) unsigned NOT NULL default '0',
`LAST` int(32) unsigned NOT NULL default '0',
`ENGINE_TYPE` int(10) NOT NULL,
`ENGINE_ID` int(15) NOT NULL,
`SRCADDR` varchar(16) NOT NULL default '0',
`DSTADDR` varchar(16) NOT NULL default '0',
`NEXTHOP` varchar(16) NOT NULL default '0',
`INPUT` int(16) unsigned NOT NULL default '0',
`OUTPUT` int(16) unsigned NOT NULL default '0',
`SRCPORT` int(16) unsigned NOT NULL default '0',
`DSTPORT` int(16) unsigned NOT NULL default '0',
`PROT` int(8) unsigned NOT NULL default '0',
`TOS` int(2) NOT NULL,
`TCP_FLAGS` int(8) unsigned NOT NULL default '0',
`SRC_MASK` int(8) unsigned NOT NULL default '0',
`DST_MASK` int(8) unsigned NOT NULL default '0',
`SRC_AS` int(16) unsigned NOT NULL default '0',
`DST_AS` int(16) unsigned NOT NULL default '0',
PRIMARY KEY (FLOW_ID)
) ENGINE=MyISAM DEFAULT CHARSET=utf8;
  1. Setup your router so it sends netflow packets to your linux box (see README/INSTALL)
  2. Create a “rotate program” that will actually enter in the information into mysql.
kelvin@monitor:/usr/bin$ cat flow-mysql-export 
#!/bin/bash

flow-export -f3 -u "username:password:localhost:3306:netflow:flows" < /flows/router/$1
  1. Create the /flows/router directory
  2. Start flow-capture (9801 is the port netflow traffic is being directed to); all done.
flow-capture -w /flows/router -E5G 0/0/9801 -R /usr/bin/flow-mysql-export

PSAD and Syslog-NG

I really like using PSAD, both on my server and my laptop. You never know where the mean people are. I also seem to use syslog-ng quite often, meanwhile PSAD seems oriented to syslog. This is fine, and I’m pretty sure the install.pl for the source built will configure syslog-ng.conf automatically. However, I almost always tend to stick with packages if I can – if they are even remotely close to the current version.
Anyways, if you need to get syslog-ng.conf configured for PSAD, this is what you need to do:
Add this code to the “# pipes” section, maybe stick to keeping it alphabetical.

destination psadpipe { pipe("/var/lib/psad/psadfifo"); };

Next, go down a little to the “# filters” section, add this:

filter f_kerninfo { facility(kern); };

And finally in the last section, add this:

log {
        source(s_all);
        filter(f_kerninfo);
        destination(psadpipe);
};

Restart syslog-ng, and you are good to go. Cheers to Michael Rash at Cipherdyne for his work on PSAD.

Hunt the Anomaly

Information is power, or so many of us think. As an I.T. administrator, no matter what the level, it is of my opinion that knowing what your network is doing is important. This includes regular operation, what it could do in the event of a disaster, or when it is just slightly not functioning.

Jeez, I’m personifying a computer network.

As I wrote in another post, I setup network monitoring for several nodes. But, what happens when an anomaly occurs? This is the story of hunting down a worm/virus, from far, far away.

While I can’t go into too many details, for obvious reasons, I’ll try and tell the story as-it-The overall process took for cleaning took several weeks to resolve, although minimizing the effect occurred the second the anomaly was discovered. The lengthy time to resolve is mainly due to the time to request computers to be patched/updated/scanned (like I said, this anomaly was with a large branch office in another country).

I’ve blurred out any relevant information for obvious reasons.

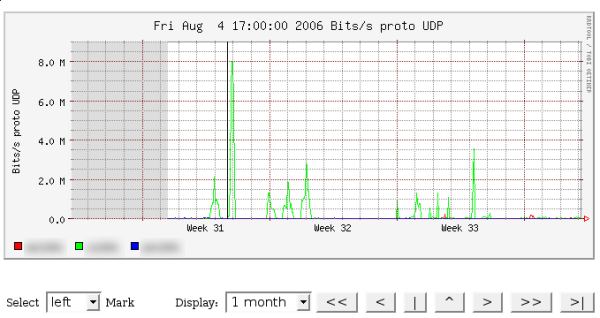
Almost immediately after setting up monitoring I noticed something strange occurring. As you can notice from the below graph (from nfsen), something is obviously wrong. If you can’t notice it, that big spike, in what we’ll call Network Green, should give you a clue. Now, I can expect a spike during lunch when people watch movies or send their 50mb picture email attachments, but this spike isn’t always at noon, and as we’ll see, it sure ain’t emails.

Find the anomaly:

So, let’s try to find out what is going on. Indeed, there are some analyzers of flow traffic that can display the types of traffic, and are useful if the issue isn’t apparent, but NFSEN’s filtering capabilities haven’t failed me yet (although seeing a graph with types of traffic is useful).

We can now take a look at what is going on. Let’s next just take a look at the statistics offered:

I’ve left the dates in there for you to see something interesting: Network Green transferred over 15 GIGS of UDP traffic. If we think back to networking basics, we can remember that UDP is a connectionless protocol. So, what uses UDP? DNS/TFTP, some streaming media, VoIP, and several types of encryption. That said, there isn’t any legitimate reason for any of the employees to use that much bandwidth, of this type. Only one thing seemed apparent: somebody was massively downloading from some p2p source, or we had a worm/virus.

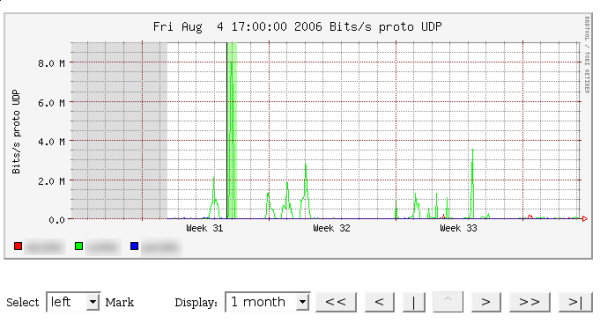
Now that we know it is UDP related, let’s find out more. I’ve filtered by UDP in the graph just so you can see how much traffic that really is. Let’s select the anomaly. We first select the left side…

Then we select the right side, and we have a pretty green highlighted section.

Now it is time to hunt the person down. Using NFSEN’s built-in filtering capabilities, I was able to find which computer was being naughty. I first created the filter rule for the appropriate network (IP obscured for confidentiality):

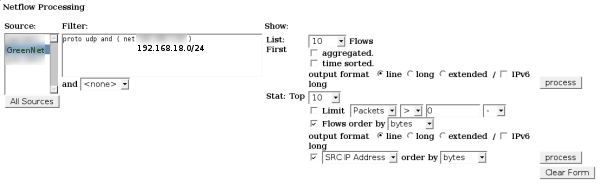
Then could see the obvious place to look next:

As is highlighted, you can see that one IP is continually transferring UDP traffic over port 14857. Well, it certainly isn’t DNS or TFTP! (But we knew that when 15+ gigs was transferred:) When we look at the Top 10 Src IP Addr, ordered by bytes, we can see that one IP transferred a whole lot of traffic.

What now? I pulled out the nmap/nessus combo and tried to see what was running. Telneting to port 14857 didn’t return any form of hello message, and nmap didn’t return any known services for whatever was on port 14857. At this point I sent out the emails/documentation to managers in the remote office requesting for anti-virus to be checked and loaded onto any computers. Next, I blocked the port, from that computer, from sending outgoing traffic. Occasionally, as you can see in the graph, another computer or two would show the same symptoms, but within two weeks the oddity had disappeared. Thanks you NFSEN and Cisco.