Revised mod_tile Install HOWTO

This is the laundry list of things I did while creating a mod_tile VMware appliance based on Ubuntu Server 8.04. I’ve kept descriptions limited but left all the commands in. Let’s start installing things…

Useful goodies for compiling source

sudo apt-get build-essential

More goodies for Mapnik + Friends

sudo apt-get install libboost-dev libboost-filesystem-dev libboost-filesystem1.34.1 libboost-iostreams-dev libboost-iostreams1.34.1 libboost-program-options-dev libboost-program-options1.34.1 libboost-python-dev libboost-python1.34.1 libboost-regex-dev libboost-regex1.34.1 libboost-serialization-dev libboost-serialization1.34.1 libboost-thread-dev libboost-thread1.34.1 libicu-dev libicu38 libstdc++5 libstdc++5-3.3-dev python2.5-dev
sudo aptitude install libfreetype6 libfreetype6-dev libjpeg62 libjpeg62-dev libltdl3 libltdl3-dev libpng12-0 libpng12-dev libtiff4 libtiff4-dev libtiffxx0c2 python-imaging python-imaging-dbg proj
sudo aptitude install libcairo2 libcairo2-dev python-cairo python-cairo-dev libcairomm-1.0-1 libcairomm-1.0-dev libglib2.0-0 libpixman-1-0 libpixman-1-dev libpthread-stubs0 libpthread-stubs0-dev ttf-dejavu ttf-dejavu-core ttf-dejavu-extra
sudo aptitude install libgdal-dev python2.5-gdal postgresql-8.3-postgis postgresql-8.3 postgresql-server-dev-8.3 postgresql-contrib-8.3
sudo aptitude install libxslt1.1 libxslt1-dev libxml2-dev libxml2 gdal-bin libgeos-dev libbz2-dev
sudo aptitude install apache2 apache2-threaded-dev apache2-mpm-prefork apache2-utils
sudo aptitude install subversion

This checks out the mapnik source:

svn co svn://svn.mapnik.org/trunk mapnik-src

Let’s build mapnik with several specific locations included.

cd mapnik-src
python scons/scons.py PYTHON=/usr/bin/python PGSQL_INCLUDES=/usr/include/postgresql PGSQL_LIBS=/usr/lib/postgresql BOOST_INCLUDES=/usr/include/boost BOOST_LIBS=/usr/lib
sudo python scons/scons.py install PYTHON=/usr/bin/python PGSQL_INCLUDES=/usr/include/postgresql PGSQL_LIBS=/usr/lib/postgresql BOOST_INCLUDES=/usr/include/boost BOOST_LIBS=/usr/lib

And prepare a few things for the mapnik rendering…

svn co http://svn.openstreetmap.org/applications/rendering/mapnik/
cd ~/mapnik
wget http://tile.openstreetmap.org/world_boundaries-spherical.tgz
tar -xpjf world_boundaries-spherical.tgz
unzip processed_p.zip
cp coastlines/* world_boundaries/
rmdir coastlines

Time to setup postgres. I have the intentions of running renderd (the mod_tile rendering engine) under whatever user Apache is running as, so I’ll setup postgres to allow the OSM user to authenticate via password. I’m not a postgres expert, so if you see me doing something totally foolish, let me know.

sudo vi /etc/postgresql/8.3/main/pg_hba.conf

And edit the authentication part as so:

# Database administrative login by UNIX sockets
local   all         postgres                          ident sameuser
local   all         osm                               password sameuser

And now to actually configure postgres for the OSM data

sudo su postgres
createuser osm
createdb -E UTF8 -O osm gis
createlang plpgsql gis
psql -d gis -f /usr/share/postgresql-8.3-postgis/lwpostgis.sql
echo "ALTER TABLE geometry_columns OWNER TO osm; ALTER TABLE spatial_ref_sys OWNER TO osm;"  | psql -d gis
echo "alter user osm with password 'columbia';" | psql
sudo /etc/init.d/postgresql-8.3 restart

Now, let’s render a sample image. Edit set-mapnik-env by changing the DB to ‘gis’, the username to ‘osm’, and the password to ‘columbia’

cd mapnik
source ./set-mapnik-env
./customize-mapnik-map >osm.xml
./generate_image.py

If you get an error about it not finding a lib, make sure to do a…

sudo ldconfig

You should have an image called ‘image.png’ in the mapnik directory, and it should look distinctly like the UK.

svn co http://svn.openstreetmap.org/applications/utils/export/osm2pgsql
cd osm2pgsql
make

Ok, that was easy. Let’s load some data. I’ve used a sample snippit from Sydney in /home/osm to illustrate this.

./osm2pgsql -W -d gis ../sydney.osm

Type in the password used for postgres (‘columbia’)

I’ll now check that the data is accessible by editing generate_image.py with the correct coords for Sydney.

ll = (150.29, -34.04, 151.25, -33.36)

Time to get mod_tile up and running.

sudo apt-get install libagg-dev
svn co http://svn.openstreetmap.org/applications/utils/mod_tile
cd mod_tile

Depending on the revision of mod_tile you are using, you are going to have to edit the source before compiling. The two files you need to read through are the Makefile and render_config.h. I change the apxs and apachectl locations to the correct place (lines 2, 13 and 14). Since I did it on a x86 image, I took out any references to lib54 (line 33). In render_config.h, I made the following changes:

Line 8

#define WWW_ROOT "/var/www"

Line 23

#define OSM_XML "/home/osm/mapnik/osm.xml"

Removed references to lib64 on lines 26 and 29.

make && make install

Set it up as a module for apache by creating a file in /etc/apache/conf.d called ‘mod_tile’ and putting in there:

LoadModule tile_module /usr/lib/apache2/modules/mod_tile.so

Created a folder called ‘osm_tiles2’ and ‘direct’ in /var/www, and make sure they are writable by whatever apache runs as (likely www-data). Restart apache.

From here, I created a file that automatically zooms in on the map I just created – you can check it out here. Start the renderd process as www-data, and browse to the sample file.

cd ~/mod_tile
sudo su www-data
./renderd

By now you should have a working mod_tile/OSM setup. After a change and tune a few things on the Ubuntu image I’ll make the VMware image available for download. I can’t wait to do some OSM projects!
Using Raw Disks with VMware Server 2

For various reasons I had the need to open a raw disk inside VMware Server 2. The reports from the field say that this just isn’t supported. Although I don’t need to actually run a raw disk, I needed to get some data off it – 400GB worth. It turns out ’not supported’ really means ’not in the UI.’ I don’t know the reason why it isn’t in the UI, maybe marketing wants people to use ESX, or maybe the UI guys fell behind with their workload.

Alas, it is possible. And here’s how.

  1. Take out your ‘raw disk’ and put it into another machine.
  2. Fire up Server 1.0.x or Workstation and open a virtual machine (or create a new one). Edit the preferences and add a new hard disk. Select ‘use a physical disk’, and select the disk you put in above. Select use entire disk. You may want to change the SCSI LUN to SCSI1:0 (depending how many disks are in your ‘proper’ server).
  3. Save it as something like 500GB.vmdk
    3b. Copy out the relevant bit from the vmx file, e.g.
# Test VM.vmx
scsi1.present = "TRUE"
scsi1:0.present = "TRUE"
scsi1:0.fileName = "500GB.vmdk"
scsi1:0.deviceType = "rawDisk"

And of course, the entire 500GB.vmdk file

# 500GB.vmdk
# Disk DescriptorFile
version=1
CID=7e245252
parentCID=ffffffff
createType="fullDevice"

# Extent description
RW 976773168 FLAT "/dev/sdb" 0

# The Disk Data Base 
#DDB

ddb.virtualHWVersion = "6"
ddb.geometry.cylinders = "60801"
ddb.geometry.heads = "255"
ddb.geometry.sectors = "63"
ddb.geometry.biosCylinders = "60801"
ddb.geometry.biosHeads = "255"
ddb.geometry.biosSectors = "63"
ddb.adapterType = "buslogic"

Note: If your guest OS is 64-bit, you won’t be able to use buslogic. Switch the last entry above to ’lsilogic’.

While you could likely create the vmdk file by hand, the only number I’m not certain about is the part after the RW. (UPDATE: Note added to page). The Disk Data Base you can just see by typing in ‘fdisk /dev/sdb’

  1. Move the disk back to the ‘server’ and turn the server back on.
  2. Edit the vmx file of whatever virtual machine you want to use and put in the part copied from the vmx file of your other machine. Alternatively, if you did an upgrade, you could just copy it across now. Create a new 500GB.vmdk file in the same directory, paste in the bit you copied out from the test virtual machine. Double check that the ‘raw disk’ comes up as the same node in /dev.
  3. Boot up the virtual machine. You will notice in the WebUI that a new scsi controller is inserted. You should also noticed a new disk accessible inside your virtual machine, e.g.
[root@files dev]# ls sd*
sda  sda1  sda2  sda3  sdb  sdb1
[root@files dev]# ls /mnt
cdrom  floppy
[root@files dev]# mkdir /mnt/disk
[root@files dev]# mount /dev/sdb1 /mnt/disk
[root@files dev]# ls /mnt/disk
Files  lost+found  Movies  Music  Personal  VMWare
[root@files dev]#

Update: Peter Jonsson kindly sent in the answer to “I don’t know what to put after the RW.” Below is the description of how to find the correct number. Thanks Peter!

The magic formula is:

ThePartAfterTheRW  =  TOTAL AMMOUNT OF DISKBYTES   /   512


This is my Western Digital 500 GB drive: 

fdisk -l

Disk /dev/sdc: 500.1 GB, 500107862016 bytes

256 heads, 63 sectors/track, 60563 cylinders

Units = cylinders of 16128 * 512 = 8257536 bytes

Disk identifier: 0x00000000

And using the formula I got the "RW" stuff:

500107862016 / 512  = 976773168

Ubuntu 8.04 64-Bit and VMware Server 2

I now have successful installation of VMware Server 2 (Beta RC1) on top of Ubuntu 8.04 64-bit. I have been using various virtualization technologies for years, and VMware is usually the easiest to install and configure. So far, VMware Server 2 RC1, has proven to be the exception to the rule.

That said, I am very excited by the direction VMware is taking – this new server version looks to have great potential.

The ‘server’ this is on is a mATX motherboard from Gigabyte (GA-G33M-DS2R), with 4GB (2x2GB) of Transcend DDR2-800 memory, topped off with the E8200. I have been nothing but impressed with this combination of hardware.

However, although I was thinking VMware Server 2 would install seamlessly over Ubuntu, I was wrong. There were a few things I had to tweak to get everything working correctly.

The first thing I had major issues with was VMware choking on the parallel port. Normally the parport is the first thing I would turn off, but in this instance, I guess excitement overtook me. My tip is to first remove the lp module from inside /etc/modules, and then disable the parallel port inside the BIOS. The symptoms I was having involved VMware halting/freezing on either startup or shutdown. This occurred for both RC1 as well as 1.0.6.

My second tip, if VMware freezes half way through starting up or shutting down, is to go through the vmware startup script, /etc/init.d/vmware, and comment out anything refering to the parport_pc. In particular, I looked for this line and made sure to comment it out:

/sbin/modprobe -r parport_pc >/dev/null 2>&1

I commented out lines 974 and 1076. After doing this, VMware loaded perfectly.

The second major issue I had occurred after actually installing VMware. I opened Firefox and went to the IP of my virtual server, logged in just fine, and loaded up my first virtual machine. However, after booting the virtual machine, I was unable to open up the remote console. It turns out I had just upgraded to Firefox 3.0.1, and the Remote Console is set to fail on anything above 3.0.0.1. The fix is quite easy.

First click where it says “click anywhere to open the virtual machine”. Copy the address of the XPI and use something like wget to download the file. This is an example:

wget --no-check-certificate https://192.168.50.10/ui/plugin/vmware-vmrc-linux-x86.xpi

If you are using Gnome, right click the file you just downloaded and say Open With then Archive Manager. Do the same for the ‘install.rdf’ file inside, specifying gedit as the application if need be. Next, edit line 20 so it reads as follows:

3.0.*

Save the file, open the XPI with Firefox, and you should be good to go.

I’ve seen a lot of other suggestions on the ’net on how to fix VMware RC1 when booting – including disabling ipv6, checking the hosts file, and running the any-any patches. None of these approaches helped me at all, but maybe it is exactly what you need. My biggest tip is that if VMware isn’t starting up or stopping correctly, open up /etc/init.d/vmware and find out exactly where it is faulting (add things like ’echo “fail”’ inside the IF statements).

VMware Tools in VMware Server 2

Installing the tools in VMware Server 2 is a little different than Workstation or the previous versions of VMware Server. Under the Summary tab of your Virtual Machine, look for a link that says “Install VMware Tools” – click it.

Wait for ‘Success’ to show up on the bottom, and jump into your virtual machine. Mount the tools as so:

mount /dev/cdrom /media/cdrom

And install as normal (copy the .tar.gz to /usr/src, extract it, install it). Easy peasy.

Setting up Windows 2003 as an NTP Client

I have had to search for the commands to setup a Windows 2003 box as an ntp client a few times now, so have decided to finally write them down here for my own good measure. Funny thing is, I’m pretty sure there are three ways to setup a 2003 box as an ntp client.

1) Via the CLI

Open up the cmd prompt and type in:

w32tm /config /manualpeerlist:"0.pool.ntp.org 1.pool.ntp.org 2.pool.ntp.org 3.pool.ntp.org" 
/syncfromflags:MANUAL /reliable:YES /update

2) Via the CLI, option 2

net time setsntp: "0.pool.ntp.org 1.pool.ntp.org 2.pool.ntp.org 3.pool.ntp.org"

3) Via GUI

Type in gpedit.msc and your local GPO editor will pop up. Go to the folder as indicated in the below screenshot and Enable the “Enable Windows NTP Client” option. Next set the “Configure Windows NTP Client” option to whatever time servers you so choose. As always, make sure to keep the 0x1 at the end.

Setting up a Mapnik Server on Ubuntu

First, we go ahead and install the needed packages. I’ve tried to include “my” list of packages that were needed to get a vanilla 7.10 image up to steam.

apt-get install build-essential libltdl3-dev autoconf libtool automake \
postgresql postgresql-8.2-postgis postgresql-server-dev-8.2 \
wget subversion libboost-python1.34.1 libboost-thread-dev \
libboost-program-options-dev libboost-regex-dev \
libboost-python-dev libboost-serialization-dev \
libboost-filesystem-dev libpng12-dev libjpeg62-dev \
libtiff4-dev zlib1g-dev libfreetype6-dev libgeos-dev \
unzip apache2-prefork-dev

Next we start to download a few components. I did this in my home directory, /home/kelvin

mod_tile - this is the apache module and rendering daemon that uses mapnik to render the maps.

svn co http://svn.openstreetmap.org/applications/utils/mod_tile

Mapnik - this will help us create the maps.

wget http://download.berlios.de/mapnik/mapnik_src-0.5.1.tar.gz

Now we start to install things.

tar -xpzf mapnik_src-0.5.1.tar.gz
cd mapnik-0.5.1

Build mapnik as per: http://wiki.openstreetmap.org/index.php/Mapnik – make sure to use scons as follows:

python scons/scons.py PYTHON=/usr/bin/python \
PGSQL_INCLUDES=/usr/include/postgresql \
PGSQL_LIBS=/usr/lib/postgresql BOOST_INCLUDES=/usr/include/boost BOOST_LIBS=/usr/lib

Now, I’m temporarily serving/rendering my tiles from an old Thinkpad “server” (PIII with 512MB RAM, of which only 128MB goes to the Xen instance that hosts all of this). So, I am using osm2pgsql on my laptop (a new Thinkpad), and pushing it into the postgres database on my “server”. So, I built osm2pgsql on my new Thinkpad, and setup postgres on the “server” to accept connections from my new Thinkpad.

pg_hba.conf – Set these lines should be added, assuming your computer is 192.168.10.100:

host    all     all     192.168.10.100/32  trust

Then I do the actual import, assuming my “server” has an IP of 192.168.10.10:

./osm2pgsql -H 192.168.10.10 -U username -l -m -d gis -W /home/location/to/osm/australia.osm

Make sure generate_image works before installing mod_tile!

Install mod_tile as per the modifications needed: http://www.kelvinism.com/howtos/notes-installing-mod_tile-mapnik/

Notes on Installing mod_tile for Mapnik

I have no idea if these notes on how to install mod_tile will be useful for anybody. The current readme states that you need to edit the source code, but never actually where. Well, this is where, at least until the code can either take switches or can auto-configure itself. This is quite brief, so if you need more details, shoot me an email or leave a comment. I have repeated this process on two Ubuntu 7.10 machines.

  1. Install mapnik as per normal – you may also need to do a…
$ ./bootstrap
$ ./autogen.sh
$ ./configure
$ make
# make install
  1. Install libagg (apt-get install libagg-dev)
  2. Make sure the mapnik library files are /usr/local/lib (libmapnik.*)
  3. Make sure to copy/install fonts and input folders into /usr/local/lib/mapnik
  4. Edit Makefile, change line 27 to where your include files are located
RENDER_CPPFLAGS += -I/usr/local/include/mapnik
  1. Edit Makefile, change line 33 to where your mapnik libraries are (libmapnik.*)
RENDER_LDFLAGS += -lmapnik -L/usr/local/lib
  1. Edit Line 40 of gen_tile.cpp to point to your osm.xml file (that you can verify works with generate_image.py)
static const char *mapfile = "/home/kelvin/mapnik-osm/osm.xml";
  1. Edit line 219 of gen_tile.cpp to point to the correct location of the datasource input.
datasource_cache::instance()->register_datasources("/usr/local/lib/mapnik/input");
  1. Edit line 221 of gen_tile.cpp to point to the correct location of your fonts directory.
load_fonts("/usr/local/lib/mapnik/fonts", 0);
  1. The module will install in /usr/lib/apache2/modules, so mod_tile.conf should read:
LoadModule tile_module /usr/lib/apache2/modules/mod_tile.so

Final note: I think it would be possible to just symlink the lib directory to lib64, although I would expect that could have some undesirable outcomes down the road. However, despite being pretty new code, how do I find mod_tile? Pretty good, actually. I expected more difficulties setting it up, but overall the procedure hasn’t been too bad. I like the approach of creating a module vs. using several middle-layers. So once again, hats off to the OSM crew.

Tunneling over SSH

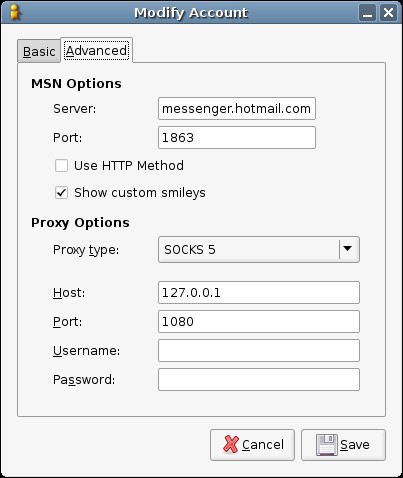
As a rule, whenever I’m online I’m logged into my server back in the States. I’m also usually wireless, which we all know is beyond insecure – I’ve found it especially useful to tunnel firefox over SSH. I try my best to tunnel stuff over SSH back, and if you want to also, this is how.

Setup the SSH/SOCKS tunnel

I’m on Linux, so this is pretty darn easy.

ssh [email protected] -D 1080

If the SSH daemon runs on a different port, you’d do something like this:

ssh -oPort=1234 [email protected] -D 1080

Remember ports below 1024 are reserved, and you would need root access. Now it is time to configure the different programs to use the newly created tunnel.

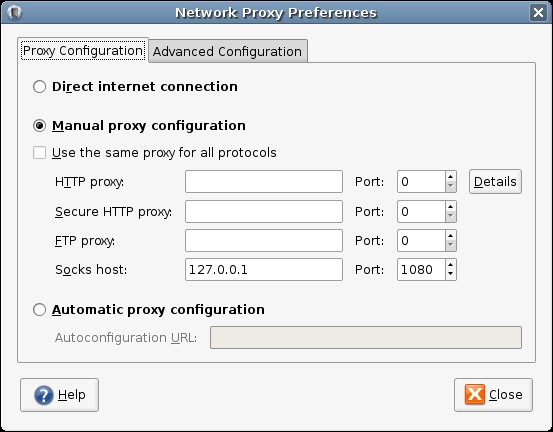
Setting up Gnome (optional)

Tunneling Pidgen

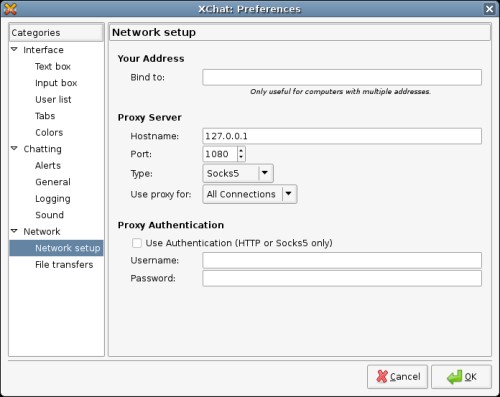
Tunneling XChat

Tunneling Firefox
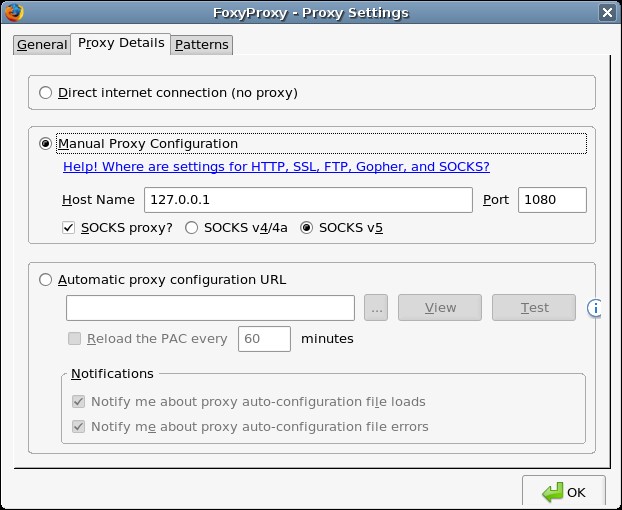
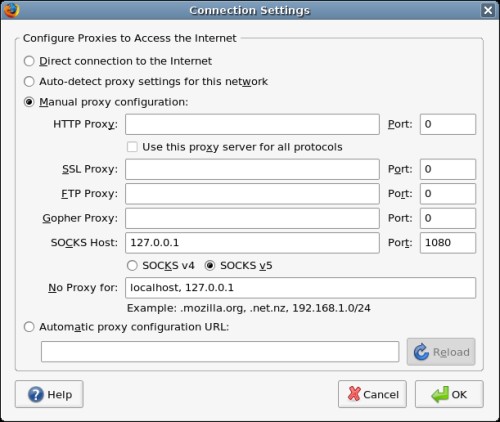
Note: I’m going to list two examples, one is with FoxyProxy and the other is with the ordinary proxy settings.

FoxyProxy

Normal Proxy

Make sure the other fields or empty, or you won’t connect.

So, there you have it. There are quite a few unix shell providers out there, I’m sure it wouldn’t be too hard to spot a link for one. I’ve seen QuadSpeedInternet having SSH access for $3/month, and JVDS or Lonestar offering possible free shells. Alternatively, you could just get a really inexpensive VPS at VPSLink ($6-$8/month, but they often have 25% off discounts).

Alexa Site Thumbnail And Django

So, you’ve seen how to look up thumbnails via python, but wonder how to integrate this with Django? I created a sample app to demonstrate. One thing to note about this app is it is slightly more complex than just using the previously mentioned ThumbnailUtility. For starters, the thumbnail is downloaded from Alexa onto the server. Another part is first searching if the thumbnail exists already, and if it does, serving that instead of querying Alexa. Let’s just start with some code.

getAST.py


#!/usr/bin/python
import base64
import datetime
import hmac
import sha
import sys
import re
import urllib
import xml.dom.minidom
import os
from urlparse import urlsplit

AWS_ACCESS_KEY_ID = 'your-access-key-id'
AWS_SECRET_ACCESS_KEY = 'your-secret-key'
STORELOC = "/path/to/store/webthumbs/"

def create_thumbnail(site_url):
    image_name = re.sub("\.|\/", "_", '.'.join(urlsplit(site_url)[1].rsplit('.', 2)[-2:])) + ".jpg"
    if not os.path.isfile(STORELOC+image_name):
        def generate_timestamp(dtime):
            return dtime.strftime("%Y-%m-%dT%H:%M:%SZ")
        def generate_signature(operation, timestamp, secret_access_key):
            my_sha_hmac = hmac.new(secret_access_key, operation + timestamp, sha)
            my_b64_hmac_digest = base64.encodestring(my_sha_hmac.digest()).strip()
            return my_b64_hmac_digest
        timestamp_datetime = datetime.datetime.utcnow()
        timestamp_list = list(timestamp_datetime.timetuple())
        timestamp_list[6] = 0
        timestamp_tuple = tuple(timestamp_list)
        timestamp = generate_timestamp(timestamp_datetime)
        signature = generate_signature('Thumbnail', timestamp, AWS_SECRET_ACCESS_KEY)
        parameters = {
            'AWSAccessKeyId': AWS_ACCESS_KEY_ID,
            'Timestamp': timestamp,
            'Signature': signature,
            'Url': site_url,
            'Action': 'Thumbnail',
            }
        url = 'http://ast.amazonaws.com/?'
        result_xmlstr = urllib.urlopen(url, urllib.urlencode(parameters)).read()
        result_xml = xml.dom.minidom.parseString(result_xmlstr)
        image_urls = result_xml.childNodes[0].getElementsByTagName('aws:Thumbnail')[0].firstChild.data
        store_name = STORELOC + image_name
        urllib.urlretrieve(image_urls, store_name)
    return image_name


Not too much to mention here, basically just an extended version of the ThumbnailUtility. The only difference is the test at the beginning, and actually downloading the thumbnail.

views.py

  
# Create your views here.
from django.shortcuts import render_to_response, get_object_or_404
from django.http import HttpResponseRedirect, HttpResponse
from webthumbs.models import *
from django import newforms as forms
from getAST import create_thumbnail

attrs_dict = { 'class': 'form-highlight' }

class imageForm(forms.Form):
    url = forms.URLField(max_length=100, verify_exists=True, widget=forms.TextInput(attrs=attrs_dict), initial='http://', label='Site URL')
    
def index(request):
    disp_img = ''
    # generate default form
    f = imageForm()
    # handle add events
    if request.method == 'POST':
        if request.POST['submit_action'] == 'Submit':
            # attempt to do add
            add_f = imageForm(request.POST)
            if add_f.is_valid():
                site_url = request.POST['url']
                disp_img = create_thumbnail(site_url)
        else:
            f = add_f
    return render_to_response(
        'webthumbs/index.html', 
        {'printform': f, 
        'disp_img': disp_img
        }
    )


The key thing to look at here is how getAST is called:


site_url = request.POST['url']  
disp_img = create_thumbnail(site_url)  


index.html

  
{% extends "base.html" %}  
  
{% block title %}Kelvinism.com - Blog{% endblock %}  
  
{% block content %}  

  
What thumbnail do you want?  


    {{ printform }}  


{% endblock %}  
  

So, there you have it, the code to take a url via form and display it right away.

Alexa Site Thumbnail with Python

For one of my sites I needed to get thumbnails, yet Alexa Site Thumbnail didn’t have any code snippets for Python. Well, no they/you do.

ThumbnailUtility.py


import base64
import datetime
import hmac
import sha
import sys
import re
import urllib
import xml.dom.minidom

AWS_ACCESS_KEY_ID = 'your-access-key-id'
AWS_SECRET_ACCESS_KEY = 'your-super-secret-key'

# This one is for an individual thumbnail...
def create_thumbnail(site_url, img_size):
    def generate_timestamp(dtime):
        return dtime.strftime("%Y-%m-%dT%H:%M:%SZ")
    def generate_signature(operation, timestamp, secret_access_key):
        my_sha_hmac = hmac.new(secret_access_key, operation + timestamp, sha)
        my_b64_hmac_digest = base64.encodestring(my_sha_hmac.digest()).strip()
        return my_b64_hmac_digest
    timestamp_datetime = datetime.datetime.utcnow()
    timestamp_list = list(timestamp_datetime.timetuple())
    timestamp_list[6] = 0
    timestamp_tuple = tuple(timestamp_list)
    timestamp = generate_timestamp(timestamp_datetime)
    signature = generate_signature('Thumbnail', timestamp, AWS_SECRET_ACCESS_KEY)
    parameters = {
        'AWSAccessKeyId': AWS_ACCESS_KEY_ID,
        'Timestamp': timestamp,
        'Signature': signature,
        'Url': site_url,
        'Action': 'Thumbnail',
        'Size': img_size,
        }
    url = 'http://ast.amazonaws.com/?'
    result_xmlstr = urllib.urlopen(url, urllib.urlencode(parameters)).read()
    result_xml = xml.dom.minidom.parseString(result_xmlstr)
    image_url = result_xml.childNodes[0].getElementsByTagName('aws:Thumbnail')[0].firstChild.data
    return image_url
  
# And this one is for a list
def create_thumbnail_list(all_sites, img_size):
    def generate_timestamp(dtime):
        return dtime.strftime("%Y-%m-%dT%H:%M:%SZ")
    
    def generate_signature(operation, timestamp, secret_access_key):
        my_sha_hmac = hmac.new(secret_access_key, operation + timestamp, sha)
        my_b64_hmac_digest = base64.encodestring(my_sha_hmac.digest()).strip()
        return my_b64_hmac_digest
    
    timestamp_datetime = datetime.datetime.utcnow()
    timestamp_list = list(timestamp_datetime.timetuple())
    timestamp_list[6] = 0
    timestamp_tuple = tuple(timestamp_list)
    timestamp = generate_timestamp(timestamp_datetime)
    
    signature = generate_signature('Thumbnail', timestamp, AWS_SECRET_ACCESS_KEY)
    
    image_loc = {}
    image_num = []
    image_size = {}
    
    count = 1   
    for s in all_sites:
        image_num = 'Thumbnail.%s.Url' % count
        image_loc[image_num] = s
        count += 1
        
    parameters = {
        'AWSAccessKeyId': AWS_ACCESS_KEY_ID,
        'Timestamp': timestamp,
        'Signature': signature,
        'Action': 'Thumbnail',
        'Thumbnail.Shared.Size': img_size,
        }
        
    parameters.update(image_loc)
    
    ast_url = 'http://ast.amazonaws.com/?'
        
    result_xmlstr = urllib.urlopen(ast_url, urllib.urlencode(parameters)).read()
    result_xml = xml.dom.minidom.parseString(result_xmlstr)
    
    image_urls = []
    count = 0
    for s in all_sites:
        image_urls.append(result_xml.childNodes[0].getElementsByTagName('aws:Thumbnail')[count].firstChild.data)
        count += 1
    return image_urls

This is how you interact with this code for a single thumbnail:

>>> from ThumbnailUtility import *
>>> create_thumbnail('kelvinism.com', 'Large')
u'http://s3-external-1.amazonaws.com/alexa-thumbnails/A46FF6A30BECB0730455F2AB306EDC28605BC19Cl?Signature=XpsxgPey4b0JgreZA46XnvHVVLo%3D&Expires=1181110547&AWSAccessKeyId=1FVZ0JNEJDA5TK457CR2'

And for a list:

>>> from ThumbnailUtility import *
>>> all_sites = ['kelvinism.com', 'alexa.com', 'vpslink.com']
>>> create_thumbnail_list(all_sites, 'Small')
[u'http://s3-external-1.amazonaws.com/alexa-thumbnails/A46FF6A30BECB0730455F2AB306EDC28605BC19Cs?Signature=%2BfcOUKwH4xD9IH9o1vfto%2FMoALU%3D&Expires=1181110698&AWSAccessKeyId=1FVZ0JNEJDA5TK457CR2', u'http://s3-external-1.amazonaws.com/alexa-thumbnails/D798D8CE8F821FCC63159C92C85B70319E44D0EFs?Signature=6jriChrGM%2F8DoejN9dn9Dv3Lc5w%3D&Expires=1181110698&AWSAccessKeyId=1FVZ0JNEJDA5TK457CR2', u'http://s3-external-1.amazonaws.com/alexa-thumbnails/23529C34E0518AA9C2577653AC237D3647BA8D2Ds?Signature=5ksuwZx0I5TqXWL3Kt%2BWP6r2LQk%3D&Expires=1181110698&AWSAccessKeyId=1FVZ0JNEJDA5TK457CR2']

This is just a simple example to get your feet wet, maybe you’ll find it useful. If you are wondering how to integrate this with Django, don’t worry, I’ve got you covered.